
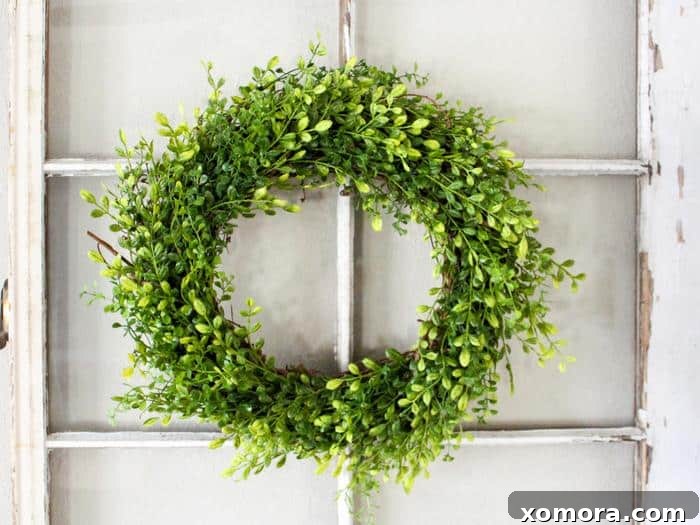
Craft Your Own Faux Boxwood Wreath: Elegant Decor on a Dime
Envisioning a beautifully decorated home doesn’t always have to come with a hefty price tag. As I embarked on the exciting journey of decorating our new home, I dreamed of adorning our window panes with classic boxwood wreaths. However, a quick glance at retail prices—ranging from $50 to $75 per wreath—was enough to make me reconsider. For two wreaths, that’s a significant chunk of change, and frankly, it just wasn’t in the budget.
Determined to achieve the look I desired without overspending, I set out to find a more economical solution. To my delight, I discovered that creating my own faux boxwood wreaths was not only incredibly simple but also remarkably affordable. I managed to craft each wreath for approximately $15, a substantial saving that truly made my home decor dreams a reality. Not only was the process quick, taking just about 30 minutes per wreath, but the results were absolutely stunning! Today, I’m thrilled to share my straightforward, budget-friendly method so you can also bring this timeless elegance into your own home.
Why DIY Your Faux Boxwood Wreath? The Benefits Beyond Savings
While the cost savings are undoubtedly a major draw, there are many compelling reasons to choose the DIY route for your faux boxwood wreaths:
- Unbeatable Affordability: As mentioned, you can create a high-quality wreath for a fraction of the cost of store-bought versions. This means more decorating power for your dollar!
- Customization to Perfection: When you DIY, you’re not limited to what’s available in stores. You get to choose the exact size, the specific shade of greenery, and the overall fullness that perfectly complements your home’s aesthetic. Want a denser, traditional look? Or perhaps a looser, more organic feel? The choice is yours.
- The Joy of Creation: There’s immense satisfaction in crafting something beautiful with your own hands. Each time you glance at your wreath, you’ll be reminded of your creativity and effort.
- Long-Lasting & Low Maintenance: Faux boxwood wreaths offer the beauty of live greenery without any of the upkeep. They won’t wilt, brown, or require watering, providing year-round charm with minimal effort.
- Beginner-Friendly Project: This craft is incredibly forgiving and requires no advanced skills. If you can use a hot glue gun, you can successfully make this wreath.
- Personalized Touch: A handmade wreath adds a unique, personal touch to your decor, making your home feel more welcoming and lived-in.
- Eco-Conscious Choice: By using a natural grapevine base, you’re incorporating sustainable materials, and the faux greenery can be reused or repurposed if your style evolves.
Essential Supplies: What You’ll Need for One Wreath
Gathering your materials is the first exciting step in any DIY project. For this faux boxwood wreath, you’ll be pleased to find that the list is short, simple, and budget-friendly. Here’s a detailed look at what you’ll need:
1. Grapevine Wreath
- Selecting the Right Size: The ideal size depends on your desired placement. For accent pieces like those hung on interior window panes or smaller doors, a 14-inch grapevine wreath is perfect and often retails for around $3.99 at craft stores during sales. For a grander statement on your front door or a large wall, opt for a larger size, such as 18-inch or 24-inch.
- Why Grapevine is Superior: While foam wreaths are an option, I strongly advocate for grapevine wreaths.
- Natural Charm: Their rustic, interwoven branches provide a beautiful, organic base that can peek through the greenery, adding texture and character.
- Durability: Grapevine wreaths are sturdy and substantial, offering a solid foundation that holds up well over time.
- Less Coverage Stress: Unlike foam, you don’t need to meticulously cover every inch of a grapevine wreath. Its natural beauty means any exposed parts simply add to its rustic appeal.
- Easy Adhesion: The textured surface and many crevices of a grapevine wreath provide excellent grip for hot glue, ensuring your greenery stays firmly in place.
2. Plastic Greenery (Faux Boxwood)
- Mimicking Nature: The key to achieving an authentic boxwood look is to choose artificial greenery with very small, dense leaves. Visit the floral or craft section of your local craft store – you’ll likely find several aisles dedicated to various faux botanicals.
- Versatility in Form: You can purchase long strands of greenery or smaller individual bushes. I often find that a combination of both works best for achieving diverse fullness and coverage. The most important factor is that the individual stems can be easily detached from the main piece.
- Smart Shopping Strategy: Craft stores frequently offer fantastic sales, often 50% off floral and greenery items every other week. Plan your purchase during these sales to maximize your savings. For example, two bushes initially priced at $7.99 each would only cost you $10.50 total with a 50% discount, making your greenery remarkably affordable.
- Quality Check for Realism: While staying within budget, try to select greenery that has a more matte finish rather than a super shiny, plastic look. This will significantly enhance the realism of your finished wreath.
3. Hot Glue Gun & Ample Glue Sticks
- The Crafter’s Best Friend: A reliable hot glue gun is indispensable for this project. Ensure you have a working glue gun and a generous supply of glue sticks on hand.
- Temperature Control is Key: If your hot glue gun has adjustable heat settings, I highly recommend using a low-heat setting. High heat can melt, warp, or discolor the plastic greenery, compromising the aesthetic of your wreath. A lower temperature provides sufficient adhesion without damaging your materials.
Your Step-by-Step Guide to Crafting a Beautiful Boxwood Wreath
Creating your faux boxwood wreath is an enjoyable and incredibly straightforward process. You’ll be amazed at how quickly your vision comes to life! Follow these simple steps for a stunning, professional-looking result.
Step 1: Prepare Your Greenery Stems
Before you even plug in your glue gun, the first task is to separate all the individual greenery stems from their main bush or strand. Most artificial greenery is designed with this in mind, featuring small plastic connectors that allow you to easily pull or snip off the stems. This step is surprisingly therapeutic and can even be a fun activity for children; my three-year-old loved creating a neat pile of stems, which genuinely helped me focus on the gluing process later on.
As you separate the stems, organize them into a manageable pile. This ensures they are readily accessible as you work, helping maintain a smooth workflow.
Step 2: Begin Gluing the Front Layer of Greenery
With your hot glue gun warmed up (remember, on a low setting to protect the plastic!), start attaching the individual greenery stems to the front of your grapevine wreath. The trick to achieving that authentic, lush boxwood look is to glue all the stems in the same direction, creating a uniform, flowing appearance around the wreath.
- Choose a Direction: Decide whether you’ll glue your stems clockwise or counter-clockwise. Consistency is key for a cohesive and polished finish.
- Strategic Layering: Begin by attaching stems along the outer edge of the wreath, allowing them to slightly overlap. Gradually work your way inward, filling the entire front surface. Think of it as creating layers to build depth and fullness.
- Building Fullness: Continue adding stems until you achieve your desired level of lushness. Some prefer a dense, tightly packed wreath, while others might opt for a slightly looser, more natural aesthetic where parts of the grapevine base are still visible. Don’t hesitate to hold the wreath up and assess its appearance as you go, adding more greenery where it looks sparse.
Step 3: Add Greenery to the Outer and Inner Edges
Once the front of your wreath is beautifully full, it’s time to add a touch of greenery to the outer and inner edges. These sections don’t require the same dense coverage as the front, as they are less visible when the wreath is hung. The objective here is simply to eliminate any stark bare spots and ensure a seamless transition from the front view.
- Sparse Application: Apply greenery more sparingly to the perimeter. Focus on tucking stems into the natural gaps of the grapevine, ensuring they extend slightly over the edges to create a soft, rounded profile.
- No Backing Needed: There’s no need to apply greenery to the very back of the wreath. This part will rest against your wall or door and will not be seen, so you can save your remaining stems for another project or to add extra fullness to the front.
Step 4: Customize for Your Desired Fullness and Style
The beauty of DIY lies in personalization. The total quantity of greenery you use and its arrangement is entirely up to your personal aesthetic. Some crafters prefer a very tightly bound, uniform look where the faux greenery completely envelops the grapevine base. Others, myself included, enjoy a more abundant fullness, allowing some greenery to extend slightly off the wreath, creating a dynamic and less structured appearance. Step back frequently to view your wreath from various angles, adding more stems where you feel it needs additional volume or to cover any remaining sparse areas until you’re completely satisfied with its lushness.
Step 5: Perform a Final Cleanup and Prep for Hanging
Once you’ve achieved your desired fullness and are happy with the overall look of your wreath, it’s time for the finishing touches. Hot glue, as it dries, often leaves behind fine, wispy strands. Carefully inspect your wreath and gently pull off any visible excess glue strands from both the greenery and the grapevine base. This quick cleanup ensures a polished and professional finish that truly elevates your handmade creation.
Step 6: Display Your Beautifully Crafted Wreath
Congratulations, your stunning faux boxwood wreath is complete and ready to adorn your home! Now for the exciting part: hanging it. You have several versatile options for displaying your new piece of decor:
- Classic Burlap Ribbon: For a charming rustic or farmhouse aesthetic, use a length of burlap ribbon. Loop it around the top of the wreath and secure it to a decorative hook or a simple nail.
- Direct Hook or Nail: Since your finished wreath is lightweight, it can be easily supported by a standard picture hook or a small nail directly on a wall or door.
- Damage-Free Adhesion: If you’re hanging your wreath on delicate surfaces like window panes, mirrors, or painted walls where you want to avoid holes, damage-free plastic hooks (such as Command hooks) are an excellent solution. Simply adhere the hook to the clean surface, hang your wreath, and voilà – instant elegance without any commitment!
Creative Display Ideas for Your Faux Boxwood Wreaths
Now that you’ve mastered the craft of making these beautiful, budget-friendly wreaths, let’s explore a myriad of ways to display them and enhance your home’s ambiance:
- Window Accents: As I did in my living room, hanging wreaths on window panes creates a charming focal point and allows natural light to highlight the greenery.
- Welcoming Front Door: A larger faux boxwood wreath offers a classic, welcoming statement on your front door, providing year-round curb appeal without concerns about weather damage.
- Interior Doors: Elevate the look of bedroom, pantry, or closet doors with smaller wreaths for a cohesive touch of elegance throughout your home.
- Gallery Wall Integration: Break up a gallery wall arrangement by incorporating a round boxwood wreath. Its organic texture provides a beautiful contrast to framed artwork and photographs.
- Mantelpiece Decor: A single, well-placed wreath above your fireplace mantel can serve as a stunning focal point, anchoring the room with its timeless appeal.
- Kitchen Cabinet Charm: For a popular farmhouse-chic look, hang miniature boxwood wreaths on upper kitchen cabinet doors using small ribbons.
- Enhancing Mirrors and Art: Attach a wreath directly to the center of a large mirror or over a piece of artwork to add depth, dimension, and an organic element.
- Seasonal Adaptations: While perfect on their own, faux boxwood wreaths are also incredibly versatile for seasonal decorating. Easily add a festive red bow for Christmas, some small faux berries for autumn, or delicate pastel ribbons for a spring refresh.
Pictured above are the finished wreaths, proudly gracing our living room! And yes, that is indeed a box of markers tucked away in the left cabinet – a clear sign of a lively home with small children. Perhaps my constant need to replenish craft supplies for the little ones has sharpened my skills in creating my own beautiful home decor. (Mostly kidding, but the incredible savings are absolutely real!)
Maintenance and Care for Your Long-Lasting Faux Boxwood Wreath
One of the most appealing aspects of a faux boxwood wreath is its minimal maintenance. However, a few simple steps can ensure your handmade creation remains fresh, vibrant, and beautiful for many years to come:
- Gentle Dusting: Over time, artificial greenery can accumulate a layer of dust. To keep your wreath looking pristine, gently dust it with a soft brush, a feather duster, or even a can of compressed air to reach into tighter spots. For a deeper clean, you can lightly mist the wreath with water mixed with a tiny drop of dish soap, then rinse carefully and allow it to air dry completely.
- Proper Storage: If you ever decide to store your wreath for a period, place it in a sturdy box large enough to prevent the greenery from being crushed or bent. Covering it with a plastic bag can also protect it from dust and debris, ensuring it’s ready to look perfect when you bring it out again.
- Sun Exposure: While artificial greenery is durable, prolonged and intense direct sunlight can eventually cause some fading over many years. If your wreath is displayed in a spot with strong sun exposure, occasionally rotating it or applying a UV protectant spray designed for artificial plants can help preserve its vibrant color.
Share Your Handmade Masterpiece!
I truly hope this comprehensive guide has inspired you to create your own gorgeous, budget-friendly faux boxwood wreaths. It’s an incredibly rewarding project that adds a significant touch of charm and elegance to your home without the daunting expense. If you embark on this enjoyable DIY adventure and craft your own beautiful wreath, I would absolutely love to see your finished work!
Please don’t hesitate to tag me on Instagram (@thewholecook) if you share photos of your handmade wreath. There’s immense joy in seeing how others interpret these tutorials and infuse their unique style into their creations. Your beautiful work might just be the inspiration someone else needs to start their own crafting journey! Happy decorating!