
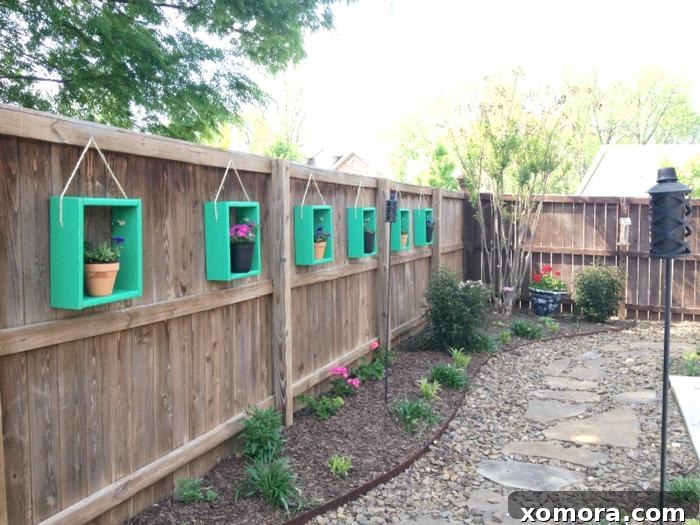
Transform Your Outdoor Space: Easy DIY Flower Shadow Boxes for Your Fence
There’s a unique magic that happens when indoor living extends seamlessly into the outdoors. For many families, the patio isn’t just an external appendage; it’s a vital extension of the home, a cherished space where memories are forged under the open sky. In our household, this couldn’t be truer. As soon as the sun peeks over the horizon, our patio springs to life, becoming the epicenter of our daily routines and special celebrations.
From the first sip of morning coffee, enjoyed alongside my toddler’s pretend-coffee sips and my son’s superhero-clad adventures, to the quiet moments of reflection during my morning Bible study, our patio witnesses it all. It’s where chalk art transforms concrete into temporary masterpieces, where the sandbox holds untold treasures, and where countless birthday parties and lively cookouts have unfolded. Just beyond, the lawn shifts from a baseball diamond to a soccer field or even a makeshift golf course, depending on the day’s athletic aspirations.
Given its central role in our family life, it’s paramount that this space feels truly inviting. I want it to be a sanctuary, a place of warmth and welcome, even when viewed from inside through an open window. This desire for beauty and comfort often fuels my various home improvement projects, many of which subtly involve my incredibly handy father-in-law. It’s an unspoken tradition; he arrives, and before long, we’re discussing the next household challenge. While many tasks, like fixing a vacuum or installing window screens, fall squarely on his capable shoulders, some special projects are designated for us to tackle together.
One such collaboration, a personal favorite, brought vibrant life to our backyard: a collection of bright flower shadow boxes for our fence. Could I have managed it alone? Perhaps. But navigating power tools while simultaneously corralling an energetic infant and a curious preschooler? That sounded like a recipe for chaos, not creativity. So, with his expertise and my vision, we embarked on a project that would transform a mundane fence into a stunning focal point.
Every year, I carefully select large pots overflowing with seasonal blooms to scatter around our outdoor areas. These reliable pots, often sourced from Sam’s Club, offer exceptional durability and aesthetic appeal, lasting for years and providing consistent splashes of color that bring a daily smile to my face. This year, my new set promises the same longevity and beauty. Beyond the flowers, we also cultivate a small edible garden, planting tomatoes, strawberries, and an assortment of fragrant herbs. My son has always delighted in watching our tiny crops grow, eagerly anticipating harvest time. This year marks a special milestone, as my daughter, with her sweet, chubby hands, will join in the excitement, ready to pluck ripe tomatoes from the vine.
Our backyard, though not expansive, is incredibly active and perfectly suited for our family of four. Yet, for a long time, every time we stepped outside, my gaze would inevitably land on one particular feature: a large, blank fence. It was a canvas waiting for color, an opportunity begging to be seized. I had a clear image in my mind, a vision of what it could become, and I knew, with my father-in-law’s invaluable help, we could bring it to life.
Two years ago, we dedicated a single afternoon to this rewarding project. The essential ingredients were simple: plywood, nails, a sturdy rope, a saw, and a can of paint. The transformation was swift and immensely satisfying.
Crafting Your Custom Fence Planters: A Step-by-Step Guide
Creating these beautiful flower shadow boxes is a surprisingly straightforward process, even for novice DIYers. The beauty lies in their simplicity and the immense visual impact they deliver. Here’s how you can replicate this project to brighten your own outdoor space:
1. Gather Your Materials and Tools
- Plywood: The primary material for your boxes. Choose a weather-resistant grade suitable for outdoor use.
- Nails or Screws: For assembling the boxes. Outdoor-grade screws offer superior durability.
- Rope: For hanging the boxes. Opt for a strong, weather-resistant material like natural fiber rope or synthetic cord.
- Outdoor Paint: Your chosen color. We used “Cosmic Green” for a vibrant pop.
- Flower Pots: To hold your plants. Clay pots, as we found, offer a lovely aesthetic.
- Plants/Flowers: Your selection for filling the boxes.
- Saw: For cutting the plywood to size.
- Drill: To make holes for the rope.
- Hammer or Screwdriver: For assembly.
- Measuring Tape and Pencil: For accurate dimensions.
- Paint Brushes/Rollers: For painting.
2. Plan Your Dimensions and Design
Consider the size of your fence and the visual effect you want to achieve. Our fence along the patio is quite large, so we opted for uniformly large shadow boxes. However, a staggered mix of various sizes can also create a dynamic and appealing look. Here are the dimensions we used, which serve as a great starting point for your own experimentation:
- Width: Approximately 20-24 inches (you can adjust based on your pots).
- Height: Approximately 12-16 inches (enough depth for good plant growth).
- Depth: 6-8 inches (to accommodate standard pots).
Measure and mark your plywood carefully before making any cuts.
3. Cut and Assemble the Wood
Using your saw, carefully cut the plywood pieces according to your planned dimensions. You’ll need:
- One back panel.
- One front panel (this will be shorter than the back to create the “shadow box” effect and allow light).
- Two side panels.
- One bottom panel.
Once cut, align the pieces and nail or screw them together to form the box. Ensure all connections are secure and sturdy, as these boxes will hold soil and plants.
4. Paint Your Boxes with Personality
Now comes the fun part – painting! We chose “Cosmic Green” for our boxes, a color that has surprisingly held up beautifully for over two years, requiring no touch-ups. When selecting your paint, ensure it’s an exterior-grade paint designed to withstand various weather conditions, offering longevity and vibrant color retention.
Consider painting the interior of the boxes as well for extra protection and a polished look. Let the paint dry completely according to the manufacturer’s instructions before proceeding.
5. Prepare for Hanging
Once the paint is dry, drill two holes near the top corners of the back panel of each box. These holes will be for threading the rope that will secure your shadow box to the fence. Ensure the holes are large enough to accommodate your chosen rope thickness.
6. Secure the Rope
Cut lengths of rope for each box. Thread one end of the rope through a hole from the back, tie a secure knot to hold it in place, then bring the rope across the back of the box to the second hole, threading it through and knotting it again. This creates a loop for hanging. Adjust the length of the rope loop to your desired hanging height on the fence.
7. Mount to Your Fence and Add Life
Carefully mount your finished shadow boxes onto your fence using appropriate hardware (e.g., strong hooks, screws, or nails) that can support the weight of the box, soil, and plants. Ensure they are level and securely attached. Then, it’s time to add your chosen flower pots. Originally, we experimented with both clay and black plastic pots. We ultimately preferred the rustic charm of the clay pots against the vibrant green of the boxes, and they provide excellent drainage for healthy plant growth. My son even personalized each clay pot with his own artistic brushstrokes, which, though faded, remain a cherished detail.
Customization and Beyond: Making It Uniquely Yours
The beauty of this DIY project lies in its flexibility. While we chose a uniform size and a bold green, you can truly make these boxes reflect your personal style. Consider:
- Varying Sizes: A playful mix of large and small shadow boxes can create an artful, asymmetrical display.
- Color Palette: Explore different paint colors that complement your home’s exterior or existing garden decor. Earthy tones, bright primary colors, or even pastel shades can create entirely different moods.
- Pot Selection: Experiment with different materials like terracotta, glazed ceramic, or even repurposed containers. Remember to ensure adequate drainage for all pots.
- Plant Choices: The possibilities are endless! Fill your boxes with vibrant annuals for continuous color, trailing plants that cascade gracefully, fragrant herbs for a sensory experience, or even succulents for a low-maintenance, modern look. Consider seasonal rotations to keep your display fresh and engaging throughout the year.
For two years now, these bright green shadow boxes have provided a cheerful backdrop to countless family photos and treasured moments. They’ve transformed a formerly plain fence into a living wall of color and texture, elevating the entire atmosphere of our patio. The joy they bring, both in their creation and their ongoing beauty, is immeasurable.
Embrace the Joy of DIY and Outdoor Living
This project is more than just building boxes; it’s about creating a more beautiful, inviting environment for your family and friends. It’s about the satisfaction of a job well done and the simple pleasure of adding a personal touch to your home. So, gather your tools, choose your colors, and get ready to transform your fence into a vibrant gallery of blooms. Once your masterpiece is complete, all that’s left is to sit back, perhaps with a refreshing drink, and bask in the splendor of your spectacular new view. Enjoy the enhanced beauty and functionality of your personalized outdoor oasis.