
Life often presents us with opportunities for fresh starts, and sometimes, those opportunities come disguised as moving boxes and a house full of forgotten furniture. As many of you already know, our family recently embarked on the exciting journey of moving into a new home, albeit in the same beloved town. With every new space comes the desire to infuse it with personal style and warmth, to truly make it your own. For me, this transition ignited a passion for hands-on transformation, leading to a somewhat ambitious (but incredibly rewarding!) commitment to refinish numerous pieces of furniture.
Embracing the DIY Spirit: My Furniture Makeover Journey
It might sound a little wild to undertake a furniture renovation marathon amidst the chaos of unpacking, but there’s an undeniable thrill in breathing new life into old items. Far from being a fleeting fancy, this venture has become a creative outlet, allowing me to personalize our new living spaces on a budget. In the past month alone, I’ve successfully tackled four different pieces, and I’m excited to share the very first one with you today. This project involved a complete furniture makeover using the versatile Annie Sloan Chalk Paint in “Old White,” combined with a healthy dose of creativity and elbow grease.
Why Choose a DIY Furniture Makeover?
The decision to refinish furniture, rather than buying new, offers a multitude of benefits. Firstly, it’s a sustainable choice, reducing waste and giving existing pieces a second life. Secondly, it’s incredibly cost-effective, allowing you to achieve high-end looks without the hefty price tag. But perhaps most importantly, a DIY project imbues your home with a unique character and a story that mass-produced items simply can’t replicate. Each brushstroke, every sanded edge, contributes to a piece that truly reflects your style and effort. This particular transformation wasn’t just about saving money; it was about creating something beautiful and functional that perfectly suited our new home’s aesthetic.
The Story of Our Old TV Stand: From Eyesore to Opportunity
For nine long years, a particular TV stand held its place in our living room. While it served its purpose adequately, I always considered it somewhat of an eyesore. Over time, I developed a remarkable ability to ignore its flaws, much like those eleven boxes still stubbornly stacked in my dining room that I’m desperately avoiding unpacking! However, with a new house came a fresh perspective, and it was time for this tired piece to either find a new purpose or a new look.
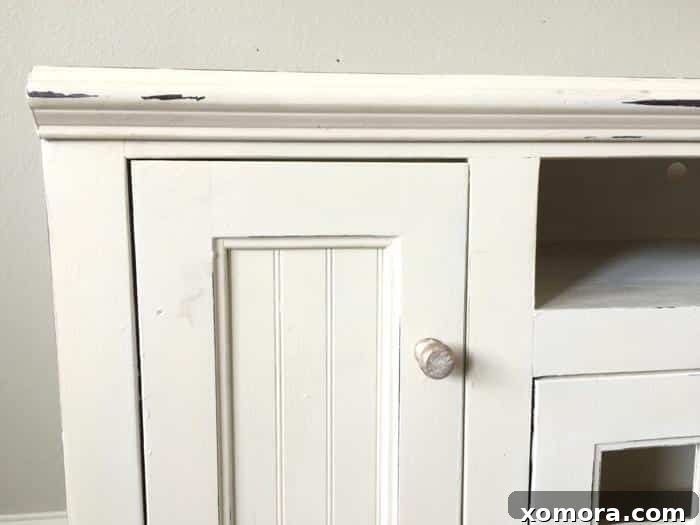
This wasn’t just any old piece; it was a saga of neglect and wear. The stand was originally a deep, somewhat dull brown, which had faded and chipped in various places over the years. Scratches marred its surface, telling tales of countless toys bumped against it or accidental scrapes during cleaning. Adding to its woes, a candle had once overheated on its top, leaving a distinct, permanent burn circle that I had cleverly (or so I thought) disguised with a strategically placed lamp. The final straw, the defining moment that sealed its fate for a makeover, was when a latch securing one of the glass doors broke. This left one door with glass and its counterpart jarringly bare, a state of mismatched elegance that was anything but classy.
Despite its numerous imperfections, I saw potential. I knew that beneath the chipped paint and the general weariness, lay a sturdy piece of furniture yearning for a new identity. With a little imagination, some dedicated effort, and the transformative power of Annie Sloan’s Chalk Paint in “Old White,” I was convinced this TV stand could become a beautiful, functional centerpiece. My initial estimate was a pint of paint, but given its dark, neglected state, it ultimately required a generous 1½ pints to achieve the desired coverage and vibrancy.
The Transformation Begins: Prepping for Paint
One of the most appealing aspects of working with Annie Sloan Chalk Paint is its minimal prep requirement. Unlike traditional paints that demand extensive sanding, priming, and often stripping, chalk paint adheres beautifully to almost any surface. However, a little preparation goes a long way in ensuring a smooth and lasting finish. My first step was to carefully remove all the existing knobs from the doors and drawers. Then, I gave the entire piece a thorough wipe-down with a damp cloth, ensuring that all dust, grime, and any lingering candle wax residue were completely removed. A clean surface is crucial for optimal paint adhesion, even with chalk paint’s forgiving nature. Additionally, with the broken latch issue, I decided to remove the lonely remaining glass panel from the other door, setting the stage for a completely new look.
Why Annie Sloan Chalk Paint? The Magic of “Old White”
Annie Sloan Chalk Paint is a revolutionary product for DIY enthusiasts, known for its versatility and ease of use. It allows you to transform furniture without the arduous tasks of sanding or priming, making it perfect for beginners and seasoned painters alike. The paint itself provides a beautiful, velvety matte finish that can be distressed for a vintage look or left smooth for a more contemporary feel. “Old White” is a classic choice, a soft, warm off-white that offers a timeless elegance. It’s incredibly adaptable, serving as a perfect base for various styles, from farmhouse rustic to shabby chic or even modern minimalist. For this particular TV stand, “Old White” was chosen to lighten up the piece dramatically and provide a fresh, clean canvas for the planned farmhouse-inspired modifications.
Mastering the Brush: Painting Layers for Perfection
With the TV stand prepped, it was time to apply the paint. Given the original dark finish, I anticipated needing several coats, and indeed, it took a total of four coats to achieve complete, opaque coverage on both the inside and outside surfaces. Each coat was applied thinly and evenly, allowing ample drying time in between to ensure proper adhesion and a smooth finish. This layering process not only built up the color but also created a durable surface that would withstand daily use.
A common question often arises when painting old furniture: what about the hardware, specifically the hinges? For this project, I made the conscious decision to paint right over the brass hinges. Why? Primarily for convenience. Removing hinges can be time-consuming and often involves dealing with stubborn screws. But beyond that, I’ve had great success painting hinges and even drawer pulls with “Old White” in previous projects. The chalk paint adheres well, and once sealed with wax, it creates a cohesive, uniform look that blends seamlessly with the piece. This method saves time and effort while contributing to the overall aesthetic transformation, making the hinges disappear rather than stand out.
Beyond the Paint: A Creative Solution for Glass Doors
As the paint layers dried, my attention turned to the doors. I had never been particularly fond of the original glass panels, even before one broke. In my mind, I envisioned a different aesthetic for this TV stand—something that evoked a charming, rustic farmhouse feel, far from the dated glass. My goal was to create the illusion of window panes within the door frames, adding architectural interest and a touch of country charm.
To bring this vision to life, I embarked on a trip to Home Depot. There, I sourced thin strips of wood, which I then carefully measured and cut to size. Using strong wood glue, I meticulously attached these strips to the inside of the door frames, creating a grid pattern that mimicked small windowpanes. Once the glue dried, these newly added wood strips were painted with the same “Old White” chalk paint, ensuring they blended perfectly with the rest of the TV stand. This simple yet effective modification completely transformed the character of the piece, turning what was once a plain, chipped glass door into a stylish, farmhouse-inspired detail.
Adding Character and Protection: Distressing and Waxing
Once the paint was completely dry and the new door details were in place, it was time to add character. The beauty of chalk paint lies in its ability to be easily distressed, creating a charming, aged, or shabby chic look. I gently sanded some of the corners and edges of the TV stand. This subtle distressing technique exposed hints of the original dark wood beneath the “Old White,” giving the piece a lived-in, authentic feel, as if it had gracefully aged over time. I used a fine-grit sanding block to control the amount of distressing, focusing on areas that would naturally show wear and tear.
After sanding, it’s crucial to wipe away any dust or residue with a dry cloth. This ensures a clean surface for the next, equally important step: waxing. To protect the newly painted surface and enhance its durability, I applied Annie Sloan’s Clear Wax. This wax acts as a sealant, hardening over time to create a resilient, protective layer that guards against moisture and everyday wear. Applying the wax is simple: a thin, even coat is worked into the paint with a wax brush or a lint-free cloth, then gently buffed to achieve a subtle sheen and depth of color. The wax not only protects but also enriches the chalk paint finish, making it smooth to the touch and giving it a professional, enduring quality.
The Final Flourish: Choosing the Perfect Hardware
No furniture makeover is truly complete without the perfect hardware. The right knobs or pulls can elevate a piece, acting like jewelry that complements its new style. For this TV stand, I opted for rustic painted gold knobs from Hobby Lobby. The warm, metallic finish with a hint of distress provided a beautiful contrast to the crisp “Old White” paint, tying in perfectly with the desired farmhouse aesthetic. These knobs weren’t just functional; they were the thoughtful finishing touch that brought the entire vision together, adding a touch of understated elegance and character.
The Grand Reveal: A Playroom’s New Focal Point
The culmination of the project was nothing short of delightful. Standing back and admiring the finished TV stand, a wide smile spread across my face. It truly looked like a completely different piece of furniture, shedding its decade-long identity as an overlooked eyesore. The “Old White” paint brought a lightness and freshness, while the custom farmhouse-style doors and rustic gold knobs added undeniable charm. This transformation was more than just a paint job; it was a rebirth, turning a forgotten item into a cherished piece.
Now, this beautifully revamped TV stand has found its perfect home in the playroom of our new house. It no longer just holds a television; it contributes to the room’s cozy, inviting atmosphere, embodying the very essence of farmhouse chic. Its journey from chipped and dark to bright and stylish serves as a constant reminder of the power of imagination and DIY. It proves that with a little effort and the right materials, even the most neglected items can be given a new lease on life, perfectly complementing new spaces and creating a sense of home.
Your Next DIY Adventure Awaits: Embrace the Power of Chalk Paint
This TV stand makeover is just one example of the incredible transformations possible with chalk paint. Whether you’re dealing with an outdated dresser, a neglected side table, or another weary piece of furniture, chalk paint offers an accessible and incredibly satisfying way to infuse your home with personalized style. The ease of application, minimal prep, and beautiful finish make it an ideal choice for anyone looking to dip their toes into the world of furniture refinishing.
So, I have to ask: Have you embarked on any furniture refinishing projects using chalk paint? If you haven’t, what’s holding you back? There’s a whole world of creative possibilities waiting to be explored. Gather your supplies, choose your favorite shade, and prepare to be amazed by the magic of a DIY furniture makeover. Your next stunning home decor piece might just be hidden in plain sight, waiting for a little love and a fresh coat of paint.