
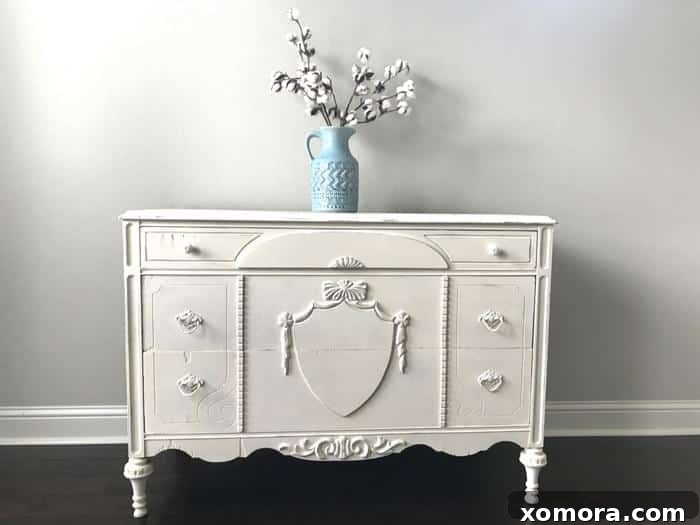
Reviving History: Transforming a 1930s Dresser into a Stunning Dining Room Buffet
There’s a unique satisfaction that comes with giving an old, forgotten piece of furniture a new lease on life. In a world increasingly dominated by mass-produced items, the act of repurposing and restoring vintage pieces stands out as a rewarding endeavor. It’s not just about saving money, though that’s certainly a compelling benefit; it’s about preserving craftsmanship, reducing waste, and imbuing your home with items that carry a story. I’ve always found immense joy in this process, watching as a tired, worn-out relic slowly transforms into a cherished focal point within my home. The daily glance at such a piece brings a quiet pride, a reminder of the effort and creativity that brought it back from the brink. This journey of transformation is one I’m passionate about sharing, especially for those who might feel intimidated by the prospect of tackling such a project themselves. Let me assure you, it’s far more accessible than you might imagine, requiring primarily a bit of time, patience, and a willingness to get your hands dirty.
The Timeless Appeal of Furniture Repurposing and Upcycling
Why choose to repurpose when new furniture is readily available? The answer lies in a blend of sustainability, character, and intrinsic value. Vintage furniture often boasts superior craftsmanship and materials compared to many modern alternatives. Pieces from eras like the 1930s were built to last, featuring solid wood construction and intricate details that are hard to find in contemporary mass production. By choosing to upcycle, you’re not only giving a second life to a beautiful object but also actively participating in an eco-friendly practice. It keeps items out of landfills and reduces the demand for new resources. Beyond the environmental benefits, there’s the undeniable charm and uniqueness that only an aged piece can offer. Each scratch, dent, and faded patch tells a story, adding a layer of depth and personality to your decor that a brand-new item simply cannot replicate. This blending of old and new creates a curated, soulful home environment that truly reflects your individual style and values.
Discovering Our Vintage Treasure: A 1930s Dresser with Potential
The inspiration for my latest project arrived a few weeks ago, carried by my wonderful mother during a visit to celebrate my son’s kindergarten graduation – a milestone that certainly brought a tear to my eye! Among the items she brought from my parents’ storage unit was this particular 1930s dresser. It was, admittedly, in need of some serious love. Years of storage and use had taken their toll, leaving it looking rather forlorn. However, where some might see a worn-out relic, I saw immense potential. Its classic lines and the subtle, elegant detailing on its façade immediately sparked a vision. I’ve always had an eye for pieces that, despite their current state, possess an inherent beauty and robust structure. This dresser, with its solid build and charming vintage appeal, was a perfect candidate. Its history was palpable, and I knew with a little effort, it could be transformed into something truly spectacular.
Despite its obvious wear and tear, the underlying beauty of its craftsmanship was undeniable. The decorative carvings and sturdy construction hinted at the quality of a bygone era. It truly needed a new purpose, and I instantly knew what that would be.
Crafting a Vision: From Dresser to Elegant Dining Buffet
The moment I laid eyes on the dresser, a clear vision materialized: it would become a magnificent buffet for our dining room. Our dining area needed a piece that offered both aesthetic appeal and practical storage, and this dresser’s dimensions and structure were perfectly suited for the role. Imagining it elegantly painted and strategically placed, I could already see it holding serving dishes, linens, and perhaps a curated display of decorative items. The transformation from a bedroom staple to a dining room showstopper was not just about changing its appearance, but also about reimagining its function within the heart of our home. This vision fueled my excitement, driving me to meticulously plan each step of the makeover to ensure the final piece would be both beautiful and highly functional.
Essential Tools & Materials: Embracing the Chalk Paint Revolution
For this particular project, my paint of choice was Annie Sloan’s Chalk Paint in ‘Old White’. If you’re familiar with furniture painting, you’ll know that chalk paint has revolutionized DIY makeovers, and Annie Sloan’s brand is often considered the gold standard. There are countless reasons why I consistently gravitate towards it, but the primary one is its incredible adherence without the need for extensive sanding or priming. This is a game-changer for anyone looking to save time and effort. The ability to simply clean a piece and start painting dramatically lowers the barrier to entry for many projects. ‘Old White’ is a timeless, versatile shade that creates a soft, inviting finish, perfect for achieving a classic or subtly distressed look that complements almost any decor style. It’s truly a ‘go-to’ color for its ability to brighten a space while maintaining a sense of antique charm.
Beyond the paint, here’s what you’ll need for a successful transformation:
- Annie Sloan Chalk Paint (Old White): The star of our show, known for its no-prep application.
- Clean Cloths or Rags: Essential for wiping down the furniture and buffing wax.
- Mild Cleaner: To remove dust, grime, and any residue from the surface.
- Paint Brushes: High-quality brushes suitable for chalk paint; Annie Sloan brushes are excellent for longevity and smooth application.
- Sanding Paper (medium grit): For distressing edges and achieving that perfectly imperfect vintage look.
- Annie Sloan Clear Wax: To seal and protect the painted finish, providing durability and a subtle sheen.
- Wax Brush or Lint-Free Cloth: For applying the clear wax evenly.
- Gloves (optional): To keep your hands clean during painting and waxing.
Step-by-Step Guide to Your Dresser Makeover
Step 1: Preparing Your Piece for its New Life
Even with paint that doesn’t require sanding, preparation is still key. My first step was a quick but thorough wipe-down of the entire dresser to remove any accumulated dust, dirt, and cobwebs. A damp cloth with a mild all-purpose cleaner does the trick perfectly. This ensures a clean surface for the paint to adhere to evenly. While I generally embrace the imperfections of vintage pieces, I did make one minor structural repair: the bottom of one leg needed to be re-glued to ensure the dresser was stable and sound. Beyond that, I left all other charming flaws untouched, knowing they would contribute to the piece’s unique character. Even my three-year-old enjoys “helping” with this initial cleaning stage, making it a fun, family-friendly start to the project.
Step 2: The First Layer of Transformation
With the dresser clean and dry, it was time for the first coat of Annie Sloan Chalk Paint. I applied it directly to the surface, working in relatively thin, even strokes. Chalk paint dries remarkably fast, which is another significant advantage, allowing you to move through the painting process much quicker than with traditional paints. Don’t worry if the first coat looks a bit patchy or uneven; this is entirely normal. The goal of this initial layer is simply to provide a foundational covering and ensure good adhesion. You’ll begin to see the transformation take shape, even at this early stage, as the ‘Old White’ starts to cover the original dark wood, hinting at the bright future of this vintage piece.
Step 3: Addressing the Details – Drawers and Hardware
To keep the process simple and efficient, I typically don’t paint the entire insides of drawers. Instead, I remove them and apply a neat swipe of paint along the visible lip of each drawer. This creates a clean, finished edge that’s visible when the drawers are closed, without the extra effort of painting the unseen interiors. While the drawers were out, I also took the opportunity to paint all the original knobs and handles. Painting the existing hardware integrates them seamlessly into the new aesthetic, preserving the dresser’s vintage authenticity. If the hardware had been severely damaged or lost, replacing it would have been an option, but in this case, a fresh coat of paint was all they needed to look renewed and cohesive with the rest of the piece.
Step 4: Building Depth with a Second Coat
After allowing the first coat to dry – which, thanks to chalk paint’s quick-drying nature, was only a matter of minutes – I proceeded with the second coat. This layer is where the magic truly starts to happen. The second application provides full, opaque coverage, bringing out the depth and richness of the ‘Old White’ color. It also helps to smooth out any brushstrokes from the first coat, creating a more uniform and polished surface. With two coats, the gorgeous details of the 1930s dresser truly began to pop, revealing the intricate carvings and elegant lines that were once obscured by years of wear. It’s a dramatic transformation that highlights the beauty of the original piece, now refreshed and ready for its next stage.
Step 5: The Art of Distressing – Embracing Vintage Charm
One of the most appealing aspects of working with vintage furniture, especially with chalk paint, is the ability to achieve a beautifully distressed look. I personally don’t want these older pieces to appear brand new; their age and history are part of their charm. Distressing strategically highlights the underlying character and details of the furniture, giving it a soft, worn, and authentic antique feel. I focused my efforts on the edges, raised details, and areas that would naturally show wear over time. Using a folded piece of medium-grit sandpaper, I gently sanded here and there, revealing hints of the original wood underneath the ‘Old White’. The key is to be light-handed and step back frequently to assess the progress, ensuring the distressing looks natural and not overdone. It’s an artistic step, allowing you to personalize the level of wear to your exact preference.
Embracing the inherent imperfections of an older piece is central to this philosophy. This dresser, like many from its era, had its share of minor dings, scratches, and inconsistencies. These aren’t flaws to be hidden but rather hallmarks of its journey through time. Unless an imperfection compromised the structural integrity (as with the leg I re-glued), I simply painted over them. They add authenticity and a story to the piece, preventing it from looking too “perfect” or mass-produced, and instead, giving it character that feels genuine and lived-in. This approach celebrates the unique history of each item.
Step 6: Protecting Your Masterpiece with Clear Wax
Once the paint and distressing were complete, the next crucial step was applying a thin coat of clear wax. This serves multiple purposes: it seals and protects the chalk paint from wear and tear, creates a durable finish, and deepens the color ever so slightly while adding a beautiful, subtle sheen. You can apply the wax using either a dedicated wax brush or a lint-free cloth. I’m particularly fond of Annie Sloan’s wax brushes; while they are an investment, their quality and longevity are unmatched. I’ve had one for nearly four years, and with proper cleaning, it still performs flawlessly, making it well worth the cost compared to repeatedly replacing cheaper brushes. The key is to apply the wax sparingly and evenly, working in sections to ensure thorough coverage without over-application.
Step 7: The Final Buff – Achieving a Smooth, Lasting Finish
The very final step in this transformation process is to buff off any excess clear wax. Using a clean, dry, lint-free cloth, gently wipe down the entire surface of the dresser. The goal here isn’t to remove all the wax, but rather to ensure an even coating and to eliminate any areas where the wax might have been applied too heavily. This buffing action also works to activate the wax, creating a beautifully smooth, slightly lustrous, and durable finish that will protect your newly painted buffet for years to come. It’s the finishing touch that brings the entire project together, leaving you with a professional-looking result that belies the simple techniques used.
The End Result: A Testament to DIY Passion
The finished buffet truly exceeded my expectations. What began as a neglected 1930s dresser has been completely revitalized, now standing as an exquisite and functional piece in my dining room. The ‘Old White’ chalk paint, combined with the subtle distressing, highlights the dresser’s vintage character while making it feel fresh and contemporary. The entire project, from start to finish, took only one afternoon – a testament to the efficiency and ease of working with chalk paint. The joy of seeing this piece, rescued from storage and lovingly restored, integrated into our daily lives is immeasurable. It’s a constant reminder that with a bit of creativity and effort, old items can gain new purpose and bring beauty to our homes.
Embark on Your Own Furniture Makeover Journey!
I hope this detailed guide encourages you to consider tackling your own furniture makeover project. It’s a wonderfully rewarding experience that allows you to express your creativity, save money, and contribute to a more sustainable lifestyle. Don’t be intimidated by the process; start with a piece you love, gather your materials, and allow yourself to enjoy the transformation. Whether it’s a dresser, a small table, or a forgotten chair, giving an old item a new story is a journey filled with satisfaction. Dive in, experiment, and prepare to be amazed by what you can achieve with a little paint and vision. Your home will thank you for the unique, soulful pieces you bring back to life.